
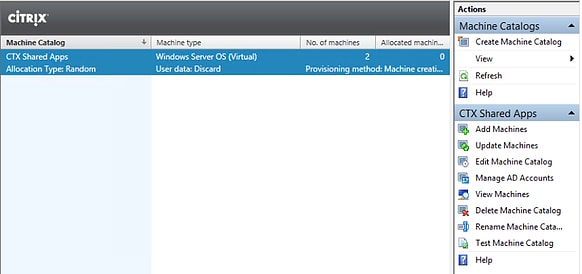
Machine Catalogs
1. Right-click Machine Catalogs and click Create Machine Catalog.
2. Select the Server OS.
3. Select Machines that are power managed and Deploy machines using MCS.
4. Select the snapshot of the virtual machine (mostly we select the recent snapshot).
We can select the virtual machine as a source, and this will also work without any problems. But we will lose control over the image management.
5. Choose how many VMs are required and select the default configuration for the Virtual machines.
6. Now we need to create machine account in AD. Select the OU in which the machines to be created and provide the naming conversion to be used
7. Finally check all the configuration and choose the Machine Catalog name and click Finish.
8. We can see the machines are being created in VMware vSphere and in AD.
9. The machines will be shutdown until the machines are assigned to a Delivery Group and then they start automatically.
Delivery Groups
10. Select Delivery Groups and create a Delivery Group.
11. Select the previously created Machine Catalog and enter the number of machines need to be added. Usually we select all the number of virtual machines that we have created.
12. Select the Users or a security group for accessing the Delivery Group.
13. We can publish applications or desktop.
14. Give the Delivery Group name.
15. Now the machines should automatically power on and it may take few minutes for all the machines to come up.
Update Machine Catalog
After the application upgrade or any modification in the Master image we will need to deploy new updated image to all the Citrix Servers in the Delivery Group.
1. Power off the Master Server.
2. From VMware vCenter take the Snapshot of the Master Server and give appropriate name to the snapshot.
3. Logon to Citrix Studio, select the machine catalog need to be updated. Right click and select Update Machines.
4. Select the latest snapshot of the Master Image and click Next. Master image is also known as clone, golden or base image
5. On the Rollout Strategy page, select immediately and update all machines at the same time. if there are more number of machines choose accordingly.
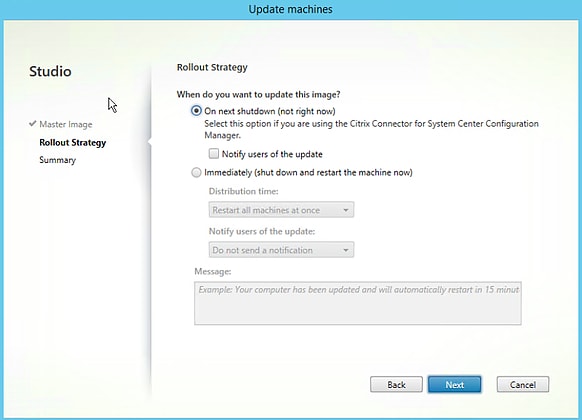
6. Click Finish to roll out the new image to all the Citrix servers in the Delivery Group.
7. After Finishing verify the Citrix servers and make sure that new application changes are reflecting in the servers.
8. Now the servers should be in registered state.
