Load Balancing Citrix StoreFront Servers

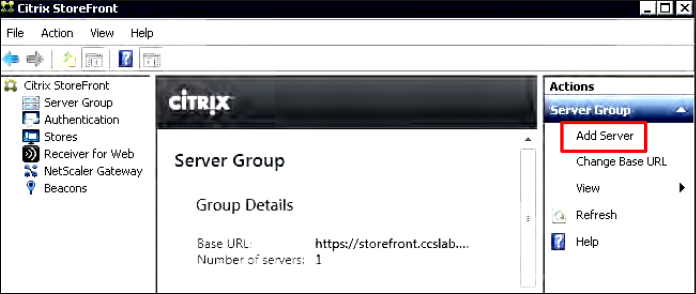
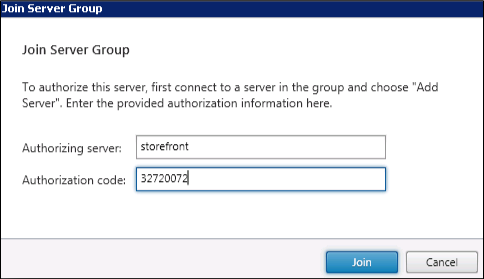
To add the second StoreFront server for load balancing with an existing StoreFront server, we need to create an Authorization code from the first server.

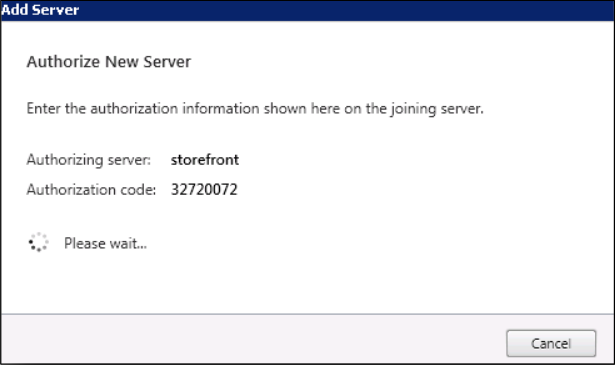
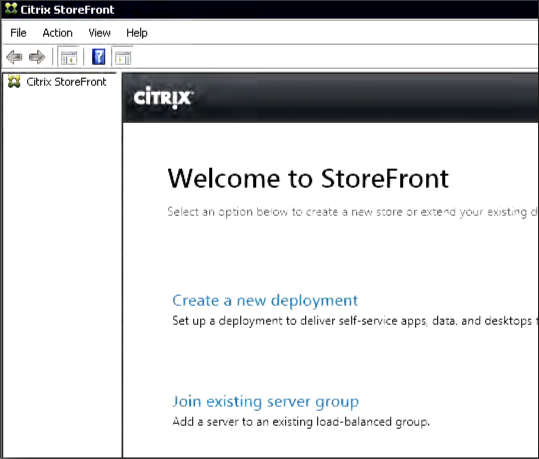
Enter the Authorization code to the second server.

Once the two StoreFront servers has been grouped, we can load balance these two servers with the NetScaler Gateway.
Open the NetScaler console and got to Traffic Management and expand Load Balancing. Click Servers and Add.

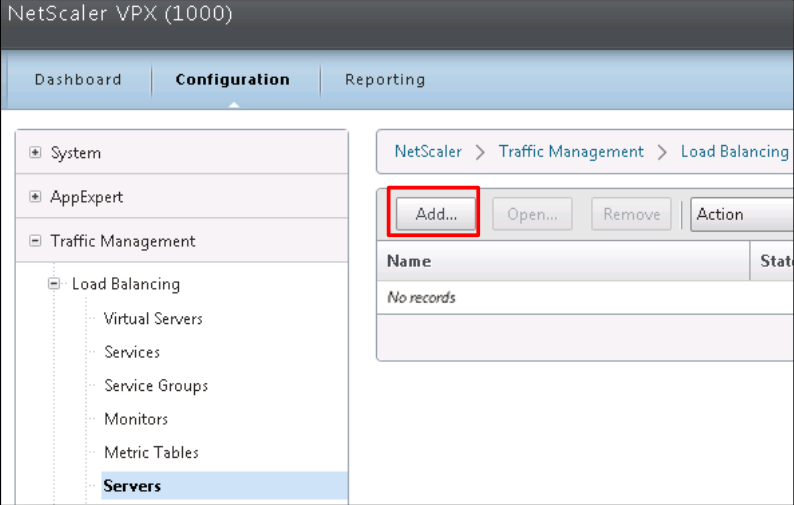
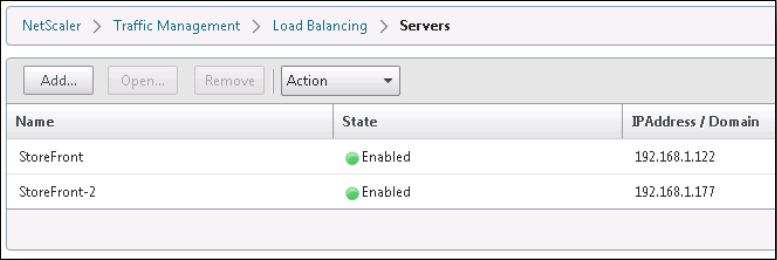
Give the two StoreFront servers host name and IP address and select Enable after adding.

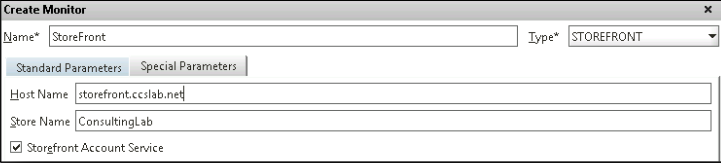
Then we need to create a Monitor to monitor the services in the StoreFront servers.

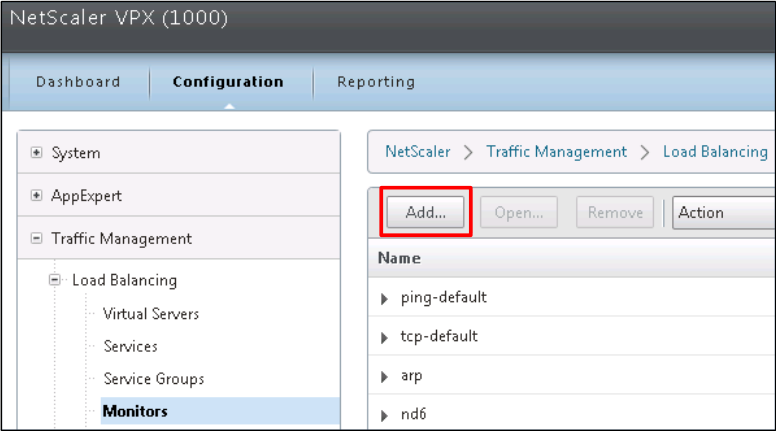
Choose a name for the Monitor and select StoreFront as the Type. Select StoreFront Account Service.

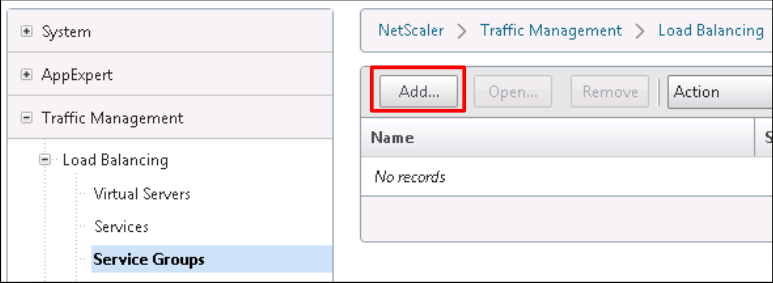
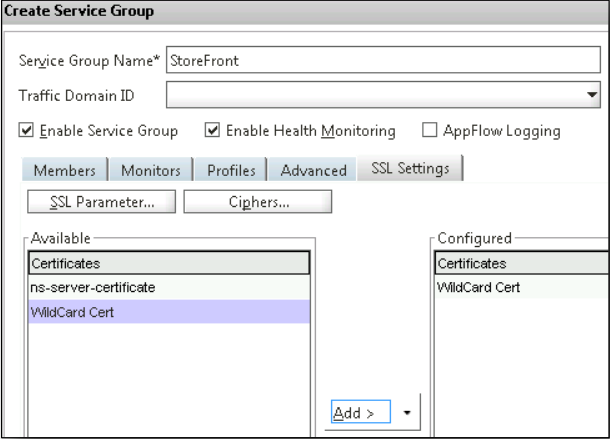
​Then we need to create a Service Group to have a single health monitor to be attached to both servers.

In the Members tab select Server Based and add the servers.


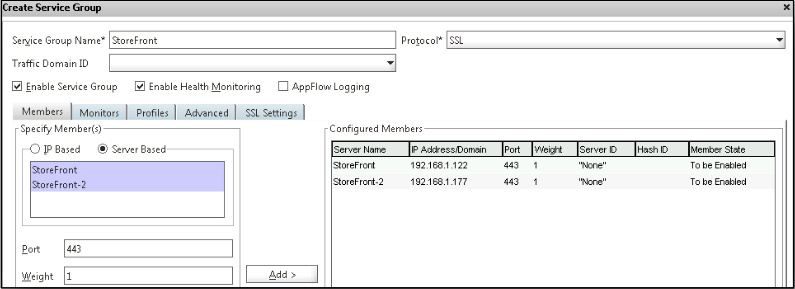
In the Monitors tab and choose the previously created StoreFront monitor and click Add

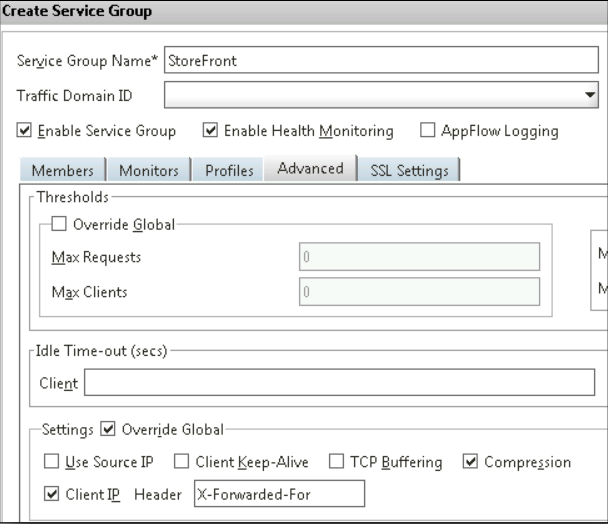
​In the Advanaced tab select Override Global, uncheck Use Source IP.
Click Client IP Header and enter in X-Forwarded-For.

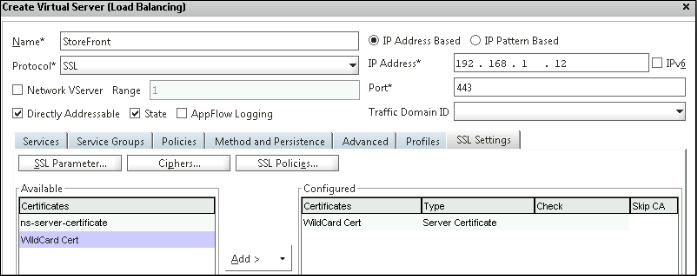
​In the SSL Settings tab select the SSL certificate and click Create.

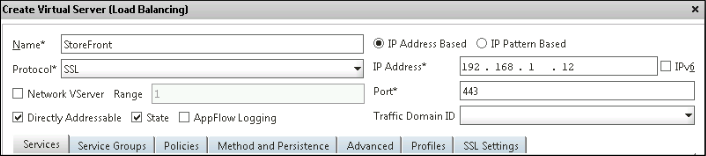
​Select Virtual Servers from Load Balancing and Add a virtual server. Give the name and IP address.

Provide SSL for protocol and 443 for port.

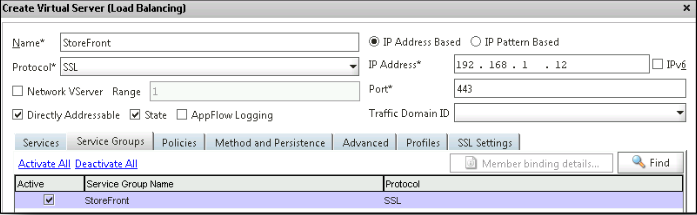
​In the Sevvice Group tab select and activate the previously created StoreFront Service Group.

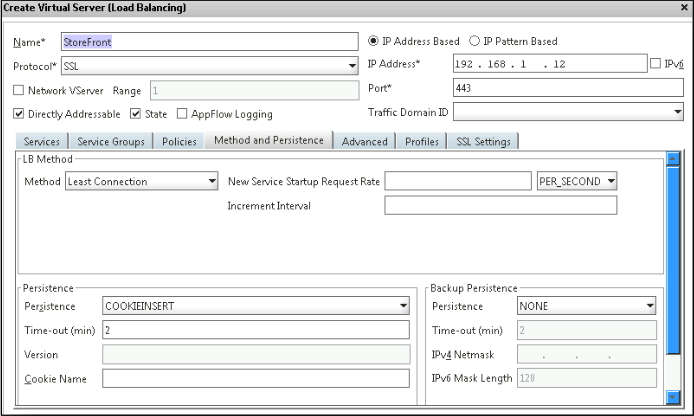
​​​In the Method and Persistence tab, give COOKIEINSERT for Persistence.

​​Create SSL certificate for the Virtual Servers to complete the process.

Posted in Citrix XenApp | 1 Comment

XenApp 7.5 quick installation and configuration

There are many changes in this new XenApp version, i.e., XenApp 7.5

1. We can not limit the instances of application allowed to run in server farm or limit  only one instance of application for each user.

2. The load evaluator has moved into Citrix policies and it cannot be applied to specific applications anymore.

3. A RDS host (worker node) can only belong to one Delivery Group. If your delivery group with Application1 has the 10 servers, you can’t assign any 2 of the 10 servers to another delivery group with another Application2.

There are lot of features missing to avoid complexity of the XenApp architecture and to merge XenApp and XenDesktop products. Below is the easy steps to install and configure XenApp 7.5.

XenApp 7.5 Quick installation and configuration

Posted in Citrix XenApp | Tagged , , , | Leave a comment

Worker (Session Host Only) or Controller modes in Citrix XenApp 6.5

In XenApp 6.5 we have 2 roles for the servers, a Worker role (session host only) and a Controller role. The default role for a XenApp server is a Controller role. The controller server is responsible for farm management tasks and the task of the Worker role is to host user sessions.

A farm requires at least one Controller, which handles the XML broker and Zone Data Collector roles. A Worker cannot perform the role of a Data Collector and cannot participate in elections.

There are two methods to detect if a XenApp server is a Worker or a Controller.

Method 1.

1. Open the AppCenter Console.     2. Navigate to the Servers section.     3. Click the server you want to check.     4. In the information tab check for the Session-host Mode field.     – if Disabled – the server is a controller     – if Enabled – the server is a worker

Method 2:

HKEY_LOCAL_MACHINE\SOFTWARE\Wow6432Node\Citrix\IMA\RUNTIME

If the DWORD value for WorkerRole is 0 then the server is a Controller and if the value is 1 then the server is a Worker.

How to switch between a Worker mode or a Controller mode.

We can switch between a Worker or Controller with the XenApp Server Role Manager:

To switch between a worker or a controller, complete the following procedure:

1. Start the XenApp Server Role Manager.    2. Remove the server from the farm.    3. Click Configure.    4. Click Add this server to an existing server farm.    5. Select the appropriate database and shadowing options.    6. In the Data Collection Option, click Enable Controller and Session-host modes.    7. Session-host only indicates that the server is a Worker


Posted in Citrix XenApp | Leave a comment

MCS process flow

The machine creation process is as follows for pooled-static, pooled-random or dedicated desktop:

1. Create master VM with OS, applications and all configurations.

2. Launch Desktop Studio; Create a Catalog.

3. Select the master VM.

4. MCS automatically creates a snapshot (thin) of the master VM.

5. MCS creates a full copy of the snapshot and places this on each storage repository defined in the host connection. This will utilize the amount of space used for your complete image.

6. MCS adds these desktops into Active Directory. This step creates the unique AD identities to be used later in the process.

7. MCS creates the number of VMs specified in the “Create Catalog Wizard” with 2 disks defined for each VM. However, in addition to the 2 disks for each VM, a master will also be stored in the same storage repository.

If you have multiple storage repositories defined, then each one will get the following types of disks:

  1. The full snapshot (read-only) of the master VM. Each storage repository will get one.
  2. A unique Identity Disk (16MB) used to provide each VM with a unique identity. The functionality within the XenDesktop Controllers creates the Identity Disks.
  3. A unique Difference Disk used to store any writes made to the VM. The disk is thin provisioned and will increase to the maximum size of the base VM if required.

8. MCS adds these newly created desktops into Active Directory, utilizing the identities created

Posted in Citrix XenDesktop | Tagged , , , , , | Leave a comment

Difference between Session Reliability, Auto Client Reconnect and ICA Keep-Alive feature

Session Reliability

Session Reliability keeps sessions active and keeps on the user’s screen display when network connectivity is interrupted. Users continue to see the application they are using until network connectivity resumes.

The user continues to access the display during the interruption and can resume interacting with the application when the network connection is restored. Session Reliability reconnects users without re-authentication prompts. Citrix Receiver users cannot override the controller setting. By default, Session Reliability is enabled through policy settings. The Session Reliability timeout policy setting has a default of 180 seconds, or 3 minutes and uses port 2598.

Auto Client Reconnect

Users can be disconnected from their sessions because of unreliable networks, highly variable network latency, or range limitations of wireless devices. With the Auto Client Reconnect feature, Receiver can detect unintended disconnections of ICA sessions and reconnect users to the affected sessions automatically. When Auto Client Reconnect feature is enabled on the server, users do not have to reconnect the interrupted sessions manually to continue working without having to re-authenticate.

By default, Auto Client Reconnect is enabled through policy settings at site level. User re-authentication is not required. However, if a server’s ICA-TCP connection is configured to reset sessions with a broken communication link, automatic reconnection does not occur. Auto Client Reconnect works only if the server disconnects sessions when there is a broken or timed out connection.

ICA Keep-Alive

Enabling the ICA Keep-Alive feature prevents broken connections from being disconnected. When enabled, if the server detects no activity (i.e., no mouse movement and no screen updates), this feature prevents Remote Desktop Services from disconnecting that session. The server sends keep-alive packets every few seconds to detect if the session is active. If the session is no longer active, the server marks the session as disconnected.

The ICA Keep-Alive feature works only if you are not using Session Reliability. Session Reliability has its own mechanisms to prevent broken connections from being disconnected. Configure ICA Keep-Alive only for connections that do not use Session Reliability. ICA Keep-Alive settings override keep-alive settings that are configured in Microsoft Windows Group Policy.

Posted in Citrix XenApp | Tagged , , , | Leave a comment