Configuration Logging in XenApp 6.5

When multiple administrators make modifications to a XenApp farm, Citrix recommends implementing Configuration Logging. With Configuration Logging we can track the changes that each administrator has made to the Citrix farm and connecting any subsequent issues reported and it is easy to identify any modifications that may need to be rolled back.

Creating the XenApp configuration logging database

The Configuration Logging feature supports Microsoft SQL Server and Oracle databases.

Open Microsoft SQL Server Management Studio and create a New Database.

Expand the Security node and right click login and then select the New Login.

Grant dbo_owner access for the user to the database.

Configure the Configuration Logging database connection

Now that the configuration logging database has been created we need to configure XenApp to create database schema, tables, and stored procedures. When the first time the Configuration Logging feature is enabled, it connects to the Configuration Logging database and discovers that the database schema does not exist. XenApp then creates the database schema, tables, and stored procedures.

In the AppCentre Console, right click the farm and get the Farm properties.

Image

Select configuration logging and open the Configure Database.

Image

Give the SQL server name, credential and the Database name. Disable encryption and test the database connectivity.

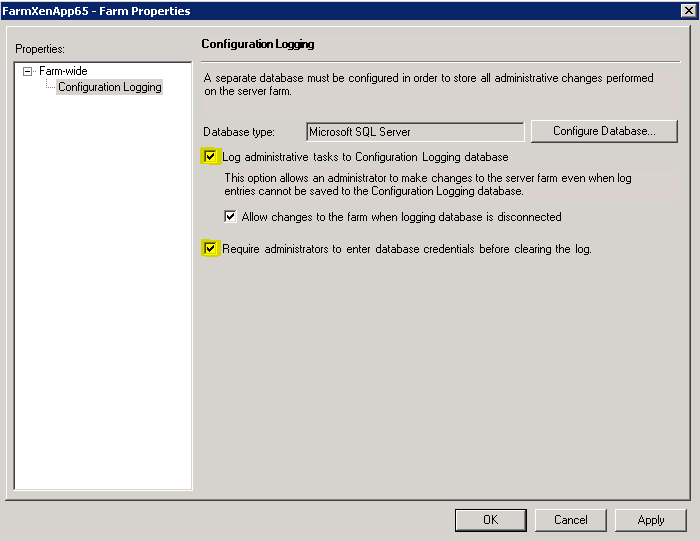
To enable Configuration Logging, select the Log administrative tasks to Configuration Logging database check box. If you want administrators to be able to make changes to the server farm when log entries cannot be saved to the Configuration Logging database, select the Allow changes to the farm when logging database is disconnected check box. To prompt administrators to enter their credentials before clearing the log, select the require administrators to enter database credentials before clearing the log check box.

Image

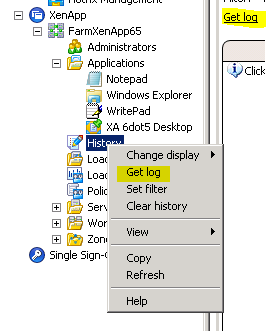
To run a report right click the History Node and click Get Log. This will generate a configuration log entry of administrative tasks performed on the XenApp Farm.

Image

The configuration log entries are displayed in chronological order, more details about each event can be found in the information panel below.

Image

You can also save an existing configuration log in to a XML file and clear the configuration log entries from the console. It requires administrators to enter database credentials before clearing the log.

Posted in Citrix XenApp | Tagged , , , , , , , | Leave a comment

Session Pre-Launch – Explained

When you would launch a Citrix application by clicking an application icon, the logon script runs, profile loads with app Group policies applied and will take more time to see the application on screen. Now we have managed to reduce application launch time by using a combination of the latest Windows Receiver 3.0 and a new feature called Session Pre-Launch.

Prerequisites for Session Pre-launch

Citrix Receiver 3.0 for Windows.
Online Plugin 13.0.
XenApp Services Site.

So lets see what makes this faster? So as a session is already loaded onto the XenApp farm and all the logon procedures like the profiles loading, logon scripts running and the commitment of policies has already taken place, when the user clicks on their application it launches without any delay!
Even though the user session isn’t running an application, this will take a XenApp license and a RDS CAL. The Pre-Launch Session will take up a very small amount of memory and CPU by running the pre-launch application (.exe). When the user actually launches an application, the Pre-Launch exe is killed and the ‘real’ applications take over and run on a very less amount of resource consumption.

How the Pre-launch Session works?
When the Receiver starts up and passes through the user credentials to the XenApp server, a Pre-Launch session is created on a XenApp server. The exact server it goes to is defined by load balancing in the usual way. Nothing is displayed to the end user. This is a silent, invisible connection. In the management console the session’s application state is “Pre-launch”.

1

On the client device, check the below setting of the following registry key (Default Installation Values):
32-bit systems
: HKEY_LOCAL_MACHINE\SOFTWARE\Citrix\ICA Client\Prelaunch
64-bit systems
: HKEY_LOCAL_MACHINE\SOFTWARE\Wow6432Node\Citrix\ICA Client\Prelaunch

6

Once we launch an application the XenApp server can use the same session and will start up straight away as it is already Authenticated, Logged in, ran the Logon Scripts and loaded the Profile when started up. When the user starts an application we use the invisible session created by the Pre-Launch Session on the XenApp server. After the application has appeared on the user’s desktop, the Pre-Launch Session on the XenApp server is gone. The session that was called Pre-launch is now used by the user’s application. Now the session ID is the same and the state is now “Active”. Subsequent launches of other applications will also start straight away as it uses a good old session sharing.

2

When a user closes down the first application before firing up another one, it doesn’t go into a disconnected state. The session now goes into what is called a “Lingering state”. So the session on the XA server that we have just closed is now running in the background, waiting for the start up or for another application. This performs the same function as the first Pre-Launch Session. It is a session that’s already been logged into, but it is waiting to be connected to again and its job now is to maintain a connection to the Receiver so that when the end user does want to run another application it will launch immediately using that existing session.

3

Session Pre-Launch Policies

The Pre-Launch Session is started by the Receiver and can be set to stay alive for a period of time if an application isn’t started up.

4

If we have launched an application and then closed, the session will go into a Lingering State. As mentioned before, this is session that can be quickly used by any new application launch too. In the above shown picture the policy (HDX Policy) has been set up to disconnect the Lingering session after 60 minutes and terminate it after another 30 minutes.

How to create Pre-Launch application?

A Pre-Launch Session is based on an existing published application in the XenApp Farm. To create a pre-launch application, do the following steps.

  1. Select the application and right click on it in the AppCenter console.
  2. Go to ‘Other Tasks’ and select ‘Create Session Pre-Launch Application’.

5

This is not the ordinary published application we already have and will not be accessed by the users. We actually created a Pre-Launcher that has taken the configuration from the published application like configured servers, users and advanced features like the color depth and encryption. Notice that the actual .exe this application uses is now CtxPreLaunch.exe. We can create a folder and move these applications to have difference.

Posted in Citrix XenApp | Tagged , , , , , | Leave a comment

Worker (Session Host Only) or Controller modes in Citrix XenApp 6.5

In XenApp 6.5 we have 2 roles for the servers, a Worker role (session host only) and a Controller role. The default role for a XenApp server is a Controller role. The controller server is responsible for farm management tasks and the task of the Worker role is to host user sessions.

A farm requires at least one Controller, which handles the XML broker and Zone Data Collector roles. A Worker cannot perform the role of a Data Collector and cannot participate in elections.

There are two methods to determine, if a XenApp server is a Worker or a Controller.

Method 1:

    1. Open the AppCenter Console.

    2. Navigate to the Servers section.

    3. Click the server you want to check.

    4. In the information tab check for the Session-host Mode field.

     * if Disabled – the server is a controller     *  if Enabled – the server is a worker

Image

Method 2:

HKEY_LOCAL_MACHINE\SOFTWARE\Wow6432Node\Citrix\IMA\RUNTIME

If the DWORD value for WorkerRole is 0 then the server is a Controller and if the value is 1 then the server is a Worker.

How to switch between a Worker mode or a Controller mode?

We can switch between a Worker or Controller with the XenApp Server Role Manager:

To switch between a Worker or a Controller, complete the following procedure:

   1. Start the XenApp Server Role Manager.

Image

   2. Remove the server from the farm.

   3. Click Configure.

Image

   4. Click Add this server to an existing server farm.

   5. Select the appropriate database and shadowing options.

   6. In the Data Collection Option, click Enable Controller and Session-host modes.

Image

    7. Session-host only indicates that the server is a Worker

This setting optimizes this server so it cannot serve as a Data Collector, XML Broker and does not participate in IMA elections. Since it redices network traffic and the load for the server, it is not recommended to select this option unless this zone already includes multiple Controllers.

Posted in Citrix XenApp | Tagged , , , , , , , , , | Leave a comment

What’s new in Citrix XenApp 6.5

Instant App Access feature
Well, the important key feature of XenApp 6.5 is Instant App Access. It creates an ICA session with the servers as the user logs into Citrix Receiver, reducing significant session creation time. When the user launches an application in the Citrix server, the session already in the cache launches immediately. This prelaunch process reduces the application launch times because the ICA session is created before the user click on an application icon.

HDX enhancements
Citrix XenApp 6.5 enhances the HDX protocol feature that came with XenDesktop 5.5. The significant updates to HDX Media Stream for Adobe Flash content can be rendered locally over more network conditions than before. The audio and video rendering redirection capability dynamically uses computing resources at the endpoint, resulting in higher server scalability and an improved user experience, even in high-latency situations.

Multi-Stream ICA
The Multi-Stream ICA technology allows XenApp ICA traffic to be delivered over the four TCP/IP streams. This larger pipe for data gives administrators more granular control for QoS routing rules. The users will experience superior audio/visual quality for apps delivered over the WAN without disrupting other HTTP traffic.

Increased device support
XenApp 6.5 with the Citrix Receiver 3.0 supports extreme multitasking, faster Windows app performance and advanced Linux device support. It enables XenApp to work with more devices including PCs, Macs, tablets, smartphones and thin clients and also major device OSs, including Apple iOS, Google Android and Chrome OS.

End-user GUI experience
New XenApp features include built-in Windows themes and the users will get an improved desktop experience, the installation of accessory apps and the ability to display high-resolution wallpapers. The complete graphical effect of Windows 7, give users the look and feel of a Windows 7 desktop.
Citrix XenApp 6.5 can be based on a locked-down image of a hosted shared desktop, allowing an increase in server density and improved security.

Troubleshooting and management console
The single enhanced App Center console gives more management features for administrators. The new Desktop Director gives a single console for managing, monitoring and troubleshooting virtual desktops and applications for all users.

Improved server farm management
While installation and managing XenApp 6.5 the Dynamic Data Center Provisioning feature provides administrators to create “controller” or “worker” roles in a server farm which can be directly associated with the Active Directory OUs and Groups thereby GPOs.

Better printing
Citrix XenApp 6.5 gives about 90% reduction in bandwidth needed for print jobs for the users who print from virtual applications.

Posted in Citrix XenApp | Tagged , , , | 1 Comment

Installation issue with Citrix XenApp 6.0 and XenApp 6.5

While launching the published application in XenApp 6.0 in Windows 2008 R2 SP1, users may face a deadlock and the server become unresponsive. The sessions already connected might get disconnected and prevent servers from accepting new connections.
To fix the above issue please install the Hotfix Rollup Pack 2 for XenApp 6.0 and it can be found in http://support.citrix.com/article/CTX133882.
While installing Hotfix Rollup Pack 1 for XenApp 6.5 and Hotfix Rollup Pack 2 for XenApp 6.0 the installation might fail with the with the error “Installation ended prematurely because of an error”. You may also see some error message related to MS DTC like “MS DTC corrupted”. The cause may be due to the uninstallation of IIS role before installing XenApp 6.0
To fix the above issue go to the command prompt and type “msdtc -resetlog” and enter. Then type “net start msdtc”. Now try to install the Hotfix Rollup Pack!

After uninstalling XenApp 6.x from a Windows server 2008 R2, we can not RDP to the server. The installation of XenApp 6.x modifies the RDP connection in the registry. When uninstalling XenApp 6.x, this original value must be copied back to ‘LoadableProtocol_Object’, but in most of the cases the original settings are not restored.

1. Remotely connect to the registry of the Server
2. Go to HKEY_LOCAL_MACHINE\SYSTEM\CurrentControlSet\Control\Terminal Server\Winstations\RDP-Tcp.
There are 2 values as below:
1) CitrixBackupRdpTcpLoadableProtocolObject (REG_SZ)
2) LoadableProtocol_Object (REG_SZ)
3. Copy the value of CitrixBackupRdpTcpLoadableProtocolObject (must be {18b726bb-6fe6-4fb9-9276-ed57ce7c7cb2}) to LoadableProtocol_Object.
4. Restart the Remote Desktop Services service on the affected machine.
5. Delete the CitrixBackupRdpTcpLoadableProtocolObject value.

Posted in Citrix XenApp | Tagged , , , , , | Leave a comment