Troubleshooting with Provisioning Services Server Machine Account Password

​The Citrix PVS target device trust relationship failed and getting the error message "The trust relationship between this workstation and the primary domain failed", while booting the Citrix PVS Target device from vDisk.

It happens when there is a mismatch of machine account password in the PVS target device and Microsoft Active Directory or the Active Directory machine account password management option was not selected under vDisk File Properties.

To fix the issue, shutdown the server.

Go to the vDisk File Properties and verify "Active Directory machine account password management" from the Options tab is selected.

Verify the Enable automatic password support is enabled on Servers Properties in the PVS server console. Validate the value for Change computer account password.

If the above mentioned steps are verified, follow the below steps.

1. Right-click on the target device, select Active Directory > Reset Machine Account Password.

2. You will get the pop-up window for selecting the Domain and Organizational Unit of the Target Device.

3. Select Reset Account.

4. Boot the server.

Posted in Citrix XenApp | Leave a comment

Publishing Explorer.exe in XenApp 6.5

When a published application such as Explorer is started, it closes instantly.

Microsoft does not recommend using Explorer.exe as a published application. Because, the published Explorer.exe application runs as a separate process with a restricted access to the desktop.
The method of copying and renaming the Explorer.exe for example, Explorer2.exe is a widely used method. It is not recommended or supported by the Citrix Development Team. The session becomes unresponsive or slow when starting several instances of the renamed Explorer2.exe. These issues are the result of internal Explorer.exe dependencies that cannot be resolved without rewriting a large parts of the operating system kernel.

When a Windows Explorer is published, it must be similar to publishing a hosted application shortcut to C:WindowsExplorer.exe with a parameter of the drive letter, for example, “C:Windowsexplorer.exe” P: in Command line and P: in Working directory.

To resolve the issue, create a DWORD (32-bit) setting called LogoffCheckerStartupDelayInSeconds with value 10 in the following location:
HKEY_LOCAL_MACHINESYSTEMCurrentControlSetControlCitrixwfshellTWI

Create and import a registry file to fix the issue. Copy the following text into a text file and save the file with a .reg extension:

Windows Registry Editor Version 5.00
[HKEY_LOCAL_MACHINESYSTEMCurrentControlSetControlCitrixwfshellTWI]
“LogoffCheckerStartupDelayInSeconds”=dword:00000010

When publishing the seamless explorer.exe application on XenApp 6.5 the session initially begins to connect as expected and after loading the dialog box disappears and the explorer application fails to appear. Initially in the Delivery Services console the application is shown as loading / connecting, later shows as disconnected and finally the session disappears.

Install the hotfix XA650W2K8R2X64025 (http://support.citrix.com/article/CTX132912)

Use the following registry key to configure the time-out:

HKEY_LOCAL_MACHINESYSTEMCurrentControlSetControlCitrixwfshellTWI

Name: ApplicationLaunchWaitTimeoutMS
Type: REG_DWORD
Data: 10000

Specifying a value of less than 10000 reverts to 10000 because 10 seconds is the minimum override.
Note, you can either use LogoffCheckerStartupDelayInSeconds or ApplicationLaunchWaitTimeoutMS

When the published Explorer is not visible in AppCenter Console as a workaround we could create and publish a batch file that calls Explorer.exe as below:
Explorer.exe
Pause

This would launch a CMD window and then launch the Explorer.exe process. However the CMD window process remains running and acts as a base for the published application instance in the console. So the CMD window is visible to the user and waits to be terminated

Posted in Citrix XenApp | Tagged , , , , , , | Leave a comment

Basics of vDisks and Provisioning desktops

In XenDesktop, MCS is one of the options for provisioning virtual desktops on the underlying Hypervisor, Host Infrastructure. The other method is PVS. Before XenDesktop 7 these virtual machines were based on client operating systems. From XenDesktop 7, MCS can also provision virtual machines based on server operating systems. However, Personal vDisks are only applied in VDI, i.e., client OS.

When creating virtual client OS based desktops using MCS, we could either create Pooled (Random or Static) or Dedicated desktops:
Pooled-Random: Desktops are assigned randomly. Each time when a user logs on he could possibly get a different desktop in a pool. When rebooted, any changes made are deleted.
Pooled-Static: Desktops are permanently assigned to a single user. Once a user logs on a desktop is assigned to that specific user. Each the time when a user logs on he will get the same machine. When rebooted, any changes made are deleted.
Dedicated Desktop: As with Pooled-Static, desktops are permanently assigned to a single user. During reboots, any changes made will persist across subsequent start-ups.

In Pooled desktops users can not install or update applications themselves and their changes will not be save when rebooting or logging off. But the management is easy and storage requirements low. In dedicated desktops, users are happy but costs per user rise because of increased storage size and management become more complicated.

Provisioning Process
The first step in provisioning a Pooled (random or static), or Dedicated desktop is to create the base (master), or golden image and this is used as a ‘Template’ for future VM provisioning. Then we will start creating a VM and assign vCPU, memory and Disk space. Install the OS, applications, AV and the XenDesktop Virtual Agent etc.Next thing is to create a Machine Catalog from XenDesktop Studio which will launch MCS in the background or we can start the MCS wizard manually. We need to decide what type of Catalog we want to create, and select the ‘Machine Type’. If we select ‘Pooled desktop’ then we have to select random or statically assigned desktop to users when they log on.

Then we need to select the base (master) image and decide how many VM’s we would like to provision and the desktop’s base resources like the amount of vCPU, memory and the hard disk size need to assign per VM. Choose either new AD computer accounts need to be created automatically, or we will use existing ones instead.

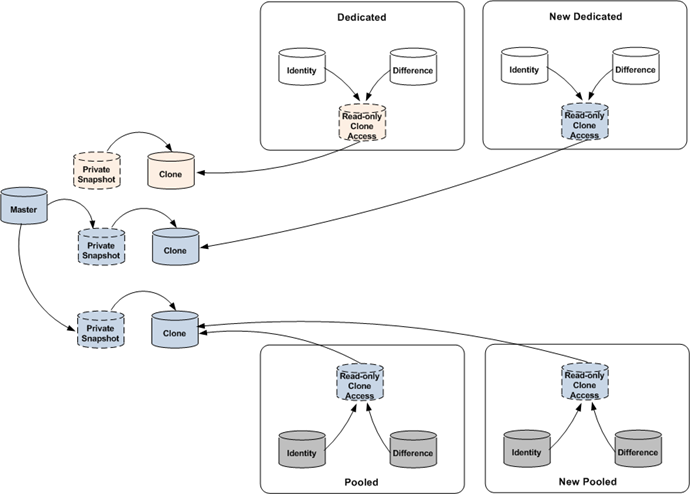
On the ‘Create accounts’ page, the next step, we can select the OU where these VM’s to be created in Active Directory and we need Administrative permissions to do this. Finally we click ‘Finish’ on the summary screen. Now MCS will create the number of machines specified, it will add two disks to each machine: an identity disk (16 MB) which provides the VM with a unique identity, also used for Active Directory, and a differencing disk used to store all writes made to the virtual machine, which is linked to the read only copy of the master VM or otherwise, the snapshot taken from it. If it is supported by the storage solution then this disk can be thin provisioned, otherwise it will be as big as the base (master) virtual machine mentioned before. Note that each VM provisioned by MCS will get its own ID and differencing disk.

During the process MCS will take a snapshot of the base (master) VM, unless you manually created and selected a snapshot while doing one of the previous steps. Doing it this way, gives you the option to give it a name, otherwise XD will name it automatically.

Next, MCS creates a full copy (or clone) of the snapshot and places this in storage repository. This is a ‘read only’ copy shared by all VM’s. If we have multiple storage repositories then each repository used by the catalog will receive its own copy. In short, these are the steps needed to set up your Pooled or Dedicated desktop catalog. We might have left out some smaller steps in between, for example, the machines will also get registered in Active Directory, and this gives us the big picture.

Storage and Management
When managing hundreds of Pooled desktops, used at the same time, all these can potentially grow as big as the base (master) image, that’s a lot of storage. In practice this probably won’t happen that much, because when a Pooled desktop gets rebooted all changes made to the VM (stored on the underlying differencing disk) will get deleted. So we need to make sure that we have enough free space available.

When we use dedicated desktops, we start out the exact same way, but when the VM gets a reboot all the writes to the underlying differencing disk won’t get deleted. The user re-logs in everyday, again and again making changes to the underlying base (master) image (written to the differencing disk) and updating regularly it won’t get deleted. When VM gets rebooted, the underlying differencing disk will keep expanding and consume more free space. So these dedicated machines will consume more storage than their Pooled machines.

We need to manage these dedicated desktops on an individual basis, because with dedicated desktops will not update the underlying base (master) image without destroying the accompanying differencing disk.

Updating the Base Image
For Pooled desktop when we update the base image, we need to point the (new) updated image to the Pooled desktops and reboot the machines.

When we update the base image of the dedicated desktops it works a bit differently. Once a differencing disk is pointing to one of the master or the base (clone) image, it cannot be changed. So when we update the base image, it will create a complete new copy or clone. The newly provisioned dedicated desktops will use this new or updated base image. The other dedicated desktops will continue to use the ‘old’ base image. So for dedicated desktops, management is not easier like pooled desktops.

Conclusion
Pooled desktops: Management is easy and the need for storage is less, but users will only get what is on the base image and can’t make any changes. In dedicated desktops users can save their work and changes as they want but the management is harder and can consume more storage. So most of the companies prefer Pooled desktops for overall use and only offer dedicated desktops when really needed.

Posted in Citrix XenApp | Leave a comment

What is new in Citrix StoreFront v2.6?

StoreFront 2.6 has lot of improvements for administration and user experience:

Domain Dropdown List for Logon Form
To enable the domain dropdown in the previous releases of StoreFront, we need to edit web.config for the Authentication Service after configuring the trusted domains in the Administration Console. Now we can do this using the StoreFront Administration Console:

1. Select Authentication node in the left pane
2. Select User name and password in the middle pane
3. Select Configure Trusted Domains in the right pane
4. In the pop-up dialog, select Trusted domains only
5. Add a number of domains to the Trusted domains list
6. Select Show domains list in the logon page
7. Click OK

Once configured, the domain drop down list will be presented in the end user interface. This applies to all receivers including Receiver for Web.

Mandatory Store
The mandatory store (the locked down store) does not allow users the ability to select which applications are displayed on the home screen. With mandatory stores, users see all available applications. We can now make mandatory stores (disable user subscriptions) in the Administration Console.

1. Select the Stores node in the left pane
2. Select the store you would like to make mandatory in the middle pane
3. Select Disable User Subscriptions in the Actions pane
4. Select Yes in the pop-up dialog.

In the mandatory store all applications are displayed in the home screen and new folder view is now built in for mandatory stores.

Receiver for Web Session Timeout
The most expected feature in StoreFront is to configure session timeout for Receiver for Web using the Administration Console.

1. In the left pane, select the Receiver for Web node
2. Select the Receiver for Web site you would like to modified in the middle pane
3. Select the Set session timeout task in the right pane
4. In the pop-up dialog, modify the timeout value
5. Click OK

Special Folder Redirection
In the previous version of StoreFront, we can enable special folder redirection by editing default.ica in the Store Service. In StoreFront 2.6 we can now configure special folder redirection by editing the web.config file or using PowerShell.

Edit the configuration file, open web.config under the Store Service (c:\inetpub\wwwroot\CitrixStore) in notepad. Locate the following lines:

<launch setNoLoadBiasFlag=”off” addressResolutionType=”DNS-port”

allowSpecialFolderRedirection=”on”>
</launch>

Change the value of allowSpecialFolderRedirection as needed and save the file.
To configure special folder redirection using PowerShell, we have to import the necessary PowerShell modules. See the following snippet:

$dsInstallProp = Get-ItemProperty `
-Path HKLM:SOFTWARECitrixDeliveryServicesManagement -Name InstallDir
$dsInstallDir = $dsInstallProp.InstallDir
& $dsInstallDir..ScriptsImportModules.ps1

The command to configure Special Folder Redirection is Set-DSClientSettings, and the syntax is:

Set-DSClientSettings [-SiteId] [-VirtualPath]
[[-SpecialFolderRedirectionAllowed] <Boolean>]

SiteId is the IIS WebSite ID for the store (by default, 1) and VirtualPath is the virtual path for the store (by default, /Citrix/Store). So the following command enables Special Folder Redirection for the store at /Citrix/Store.

Set-DSClientSettings -SiteId 1 -VirtualPath “/Citrix/Store” `
-SpecialFolderRedirectionAllowed $true

Receiver for Web Multiple Launch Prevention
One of the most expected features is to prevent multiple launch of Citrix client by configuring the timeout value. Although it was possible in StoreFront v2.5 with JavaScript customization, now it is configurable in StoreFront v2.6 by web.config and PowerShell.

To modify the timeout value for multiple launch prevention, open web.config in “C:\inetpub\wwwroot\Citrix\StoreWeb” in Notepad. Locate the following lines:

<userInterface autoLaunchDesktop=”false” multiClickTimeout=”3″
enableAppsFolderView=”true”>

Change the value of multiClickTimeout according to your need and save the file. The value is in seconds.

To configure the timeout value for multiple launch prevention using PowerShell, import the necessary PowerShell modules as described in the previous section and run Set-DSMultiClickTimeout.

The syntax is:

Set-DSMultiClickTimeout [-SiteId] [-VirtualPath]
[-IntervalInSeconds] <Int32>

SiteId is the IIS WebSite ID and the default value is 1, VirtualPath is “/Citrix/StoreWeb”. The following command would modify the timeout value to be 10 seconds for the Receiver for Web site at /Citrix/StoreWeb:

Set-DSMultiClickTimeout -SiteId 1 -VirtualPath /Citrix/StoreWeb
-IntervalInSeconds 10

Posted in Citrix | Tagged , , , , , , , , , , , , , , , | Leave a comment

Basics of Citrix Netscaler

There are 2 NetScaler editions; Citrix NetScaler and Citrix NetScaler Gateway. Although these two seem similar, there are some distinct differences depending on the licenses used.

Citrix Netscaler refers to their Application Delivery Controller (ADC), while the Netscaler Gateway, formerly known as the Citrix Access Gateway (CAG), is primarily used for “secure remote access”. It’s basically a Netscaler but with limited functionality due to the Netscaler Gateway license we upload. Netscaler ADC’s are capable of doing much more than just secure remote access. It can be used for load balancing and HA, content switching, application (SSL) offloading, application firewall, cloud connectivity, hybrid cloud solutions and (a lot) more.

The Netscaler uses vServers to deliver different services. We can configure multiple independent vServers on the same Netscaler serving different purposes or services, like a load balancing, content switching and SSL offload etc.

The Netscaler IP Address (NSIP) is the IP address which is used by the Administrator to manage and configure the Netscaler There can only be one NSIP address, and it is used when setting up and configuring the Netscaler for the first time. NSIP cannot be removed and can’t be changed without rebooting the Netscaler.

The Subnet IP Address (SNIP) is used for server side connections, it means, SNIP is used to route traffic from the Netscaler to a Subnet directly connected to the Netscaler. The Netscaler has a mode named USNIP (Use SNIP), which is enabled by default, this makes the SNIP address to be used as the source address when sending packets from the NetScaler to the internal network.

When a SNIP address is configured, a corresponding route is added to the Netscaler routing table, which is used to determine the optimal route from the Netscaler to the internal network. If Netscaler finds the SNIP address in the routing table as a part of the route, it will use it to pass-through the network traffic using the SNIP address as its source address.

A SNIP address is not mandatory as NSIP. If we have multiple subnet we will have to configure a SNIP address for each subnet separately. Also, when multiple SNIP addresses are configured on the same subnet, they will be used in a Round Robin fashion.

The Mapped IP Address (MIP) is similar to the SNIP. The MIP addresses are used when a SNIP address isn’t not available or when USNIP (Use SNIP) is disabled. It will also be used as the source IP address as SNIP. Only when the configured MIP address is the first in the subnet the Netscaler will add a route entry to its routing table.

The Virtual IP Address (VIP) is the IP address of a vServer that the end users will connect to, and through which they will eventually be authenticated etc. The VIP address is never used as the source IP and so it is not involved in back-end server communication, instead this will always be handled by a SNIP and MIP address.

​An external user will contact the Netscaler Gateway over port 80 or 443 and connect to the externally accessible virtual IP (VIP) address of the Netscaler (Gateway) vServer. In the diagram above refer 1.VIP and 1. vServer. Once a connection is established there are few options, for example, using a SNIP address the (unauthenticated) user will connect to the StoreFront server located on the internal network where authentication takes place.

If authentication takes place on the Netscaler, the user’s credentials are forwarded using the NSIP, shown in 2. NSIP, to the internal authentication services (AD), where they will be validated. Once validated, we may have two factor authentications 2. NSIP using SMS passcode tokens. In this way every user will have to fill the username and password plus an additional auto generated token code which will expire every few minutes, which is extremely secure.

Once the user is authenticated, the authentication services will pass through the user credentials to the StoreFront server. The already authenticated user will connect to the StoreFront server, 3. SNIP where it will enumerate the user applications.

Then this information will travel back into the Netscaler and through the Netscaler Gateway vServer to the users screen as shown in 4. vServer

At last, when the user starts an application, the StoreFront server will generate a .ICA file which is send back to the users device and is used to connect the user directly to the requested resource on one of the XenDesktop / XenApp servers. During the last phase of setting up this connection the Gateway server will check up on the earlier generated STA file to validate the session, after that the application or Desktop will be launched as shown in 5. App launch

Posted in Citrix XenApp | Leave a comment