
StoreFront 2.6 has lot of improvements for administration and user experience:
Domain Dropdown List for Logon Form
To enable the domain dropdown in the previous releases of StoreFront, we need to edit web.config for the Authentication Service after configuring the trusted domains in the Administration Console. Now we can do this using the StoreFront Administration Console:
1. Select Authentication node in the left pane
2. Select User name and password in the middle pane
3. Select Configure Trusted Domains in the right pane
4. In the pop-up dialog, select Trusted domains only
5. Add a number of domains to the Trusted domains list
6. Select Show domains list in the logon page
7. Click OK
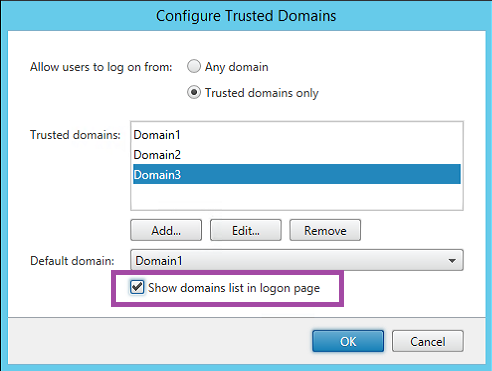
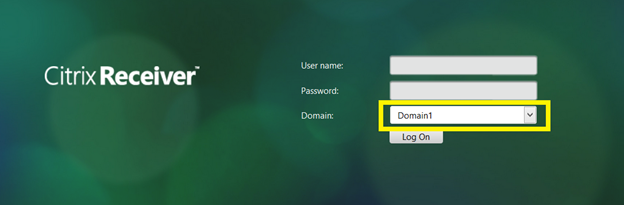
Once configured, the domain drop down list will be presented in the end user interface. This applies to all receivers including Receiver for Web.
Mandatory Store
The mandatory store (the locked down store) does not allow users the ability to select which applications are displayed on the home screen. With mandatory stores, users see all available applications. We can now make mandatory stores (disable user subscriptions) in the Administration Console.
1. Select the Stores node in the left pane
2. Select the store you would like to make mandatory in the middle pane
3. Select Disable User Subscriptions in the Actions pane
4. Select Yes in the pop-up dialog.
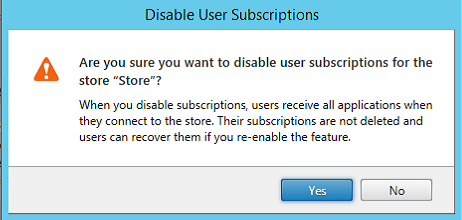
In the mandatory store all applications are displayed in the home screen and new folder view is now built in for mandatory stores.
Receiver for Web Session Timeout
The most expected feature in StoreFront is to configure session timeout for Receiver for Web using the Administration Console.
1. In the left pane, select the Receiver for Web node
2. Select the Receiver for Web site you would like to modified in the middle pane
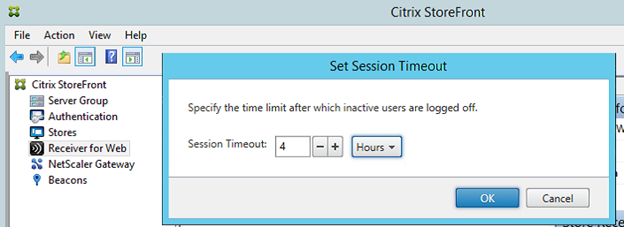
3. Select the Set session timeout task in the right pane
4. In the pop-up dialog, modify the timeout value
5. Click OK
Special Folder Redirection
In the previous version of StoreFront, we can enable special folder redirection by editing default.ica in the Store Service. In StoreFront 2.6 we can now configure special folder redirection by editing the web.config file or using PowerShell.
Edit the configuration file, open web.config under the Store Service (c:\inetpub\wwwroot\CitrixStore) in notepad. Locate the following lines:
<launch setNoLoadBiasFlag=”off” addressResolutionType=”DNS-port”
…
allowSpecialFolderRedirection=”on”>
</launch>
Change the value of allowSpecialFolderRedirection as needed and save the file.
To configure special folder redirection using PowerShell, we have to import the necessary PowerShell modules. See the following snippet:
$dsInstallProp = Get-ItemProperty `
-Path HKLM:SOFTWARECitrixDeliveryServicesManagement -Name InstallDir
$dsInstallDir = $dsInstallProp.InstallDir
& $dsInstallDir..ScriptsImportModules.ps1
The command to configure Special Folder Redirection is Set-DSClientSettings, and the syntax is:
Set-DSClientSettings [-SiteId] [-VirtualPath]
[[-SpecialFolderRedirectionAllowed] <Boolean>]
SiteId is the IIS WebSite ID for the store (by default, 1) and VirtualPath is the virtual path for the store (by default, /Citrix/Store). So the following command enables Special Folder Redirection for the store at /Citrix/Store.
Set-DSClientSettings -SiteId 1 -VirtualPath “/Citrix/Store” `
-SpecialFolderRedirectionAllowed $true
Receiver for Web Multiple Launch Prevention
One of the most expected features is to prevent multiple launch of Citrix client by configuring the timeout value. Although it was possible in StoreFront v2.5 with JavaScript customization, now it is configurable in StoreFront v2.6 by web.config and PowerShell.
To modify the timeout value for multiple launch prevention, open web.config in “C:\inetpub\wwwroot\Citrix\StoreWeb” in Notepad. Locate the following lines:
<userInterface autoLaunchDesktop=”false” multiClickTimeout=”3″
enableAppsFolderView=”true”>
Change the value of multiClickTimeout according to your need and save the file. The value is in seconds.
To configure the timeout value for multiple launch prevention using PowerShell, import the necessary PowerShell modules as described in the previous section and run Set-DSMultiClickTimeout.
The syntax is:
Set-DSMultiClickTimeout [-SiteId] [-VirtualPath]
[-IntervalInSeconds] <Int32>
SiteId is the IIS WebSite ID and the default value is 1, VirtualPath is “/Citrix/StoreWeb”. The following command would modify the timeout value to be 10 seconds for the Receiver for Web site at /Citrix/StoreWeb:
Set-DSMultiClickTimeout -SiteId 1 -VirtualPath /Citrix/StoreWeb
-IntervalInSeconds 10
